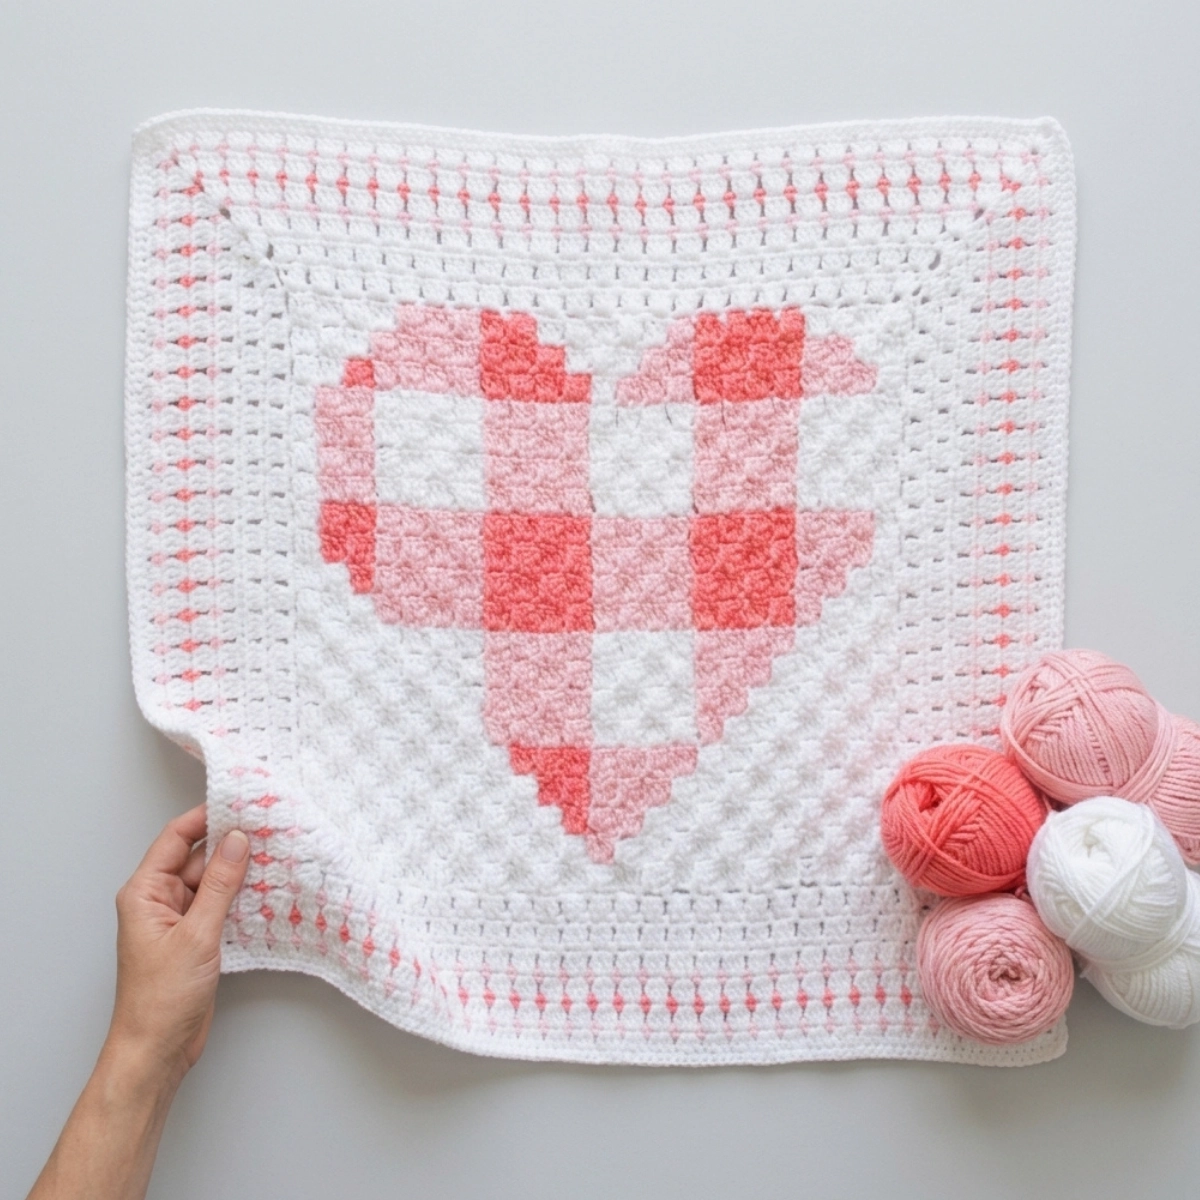
My obsession with gingham is real, and this crochet gingham heart blanket is proof of that. I used the corner to corner stitch to work the center heart section and then added six rounds of a block stitch border around the whole thing. It is one of my favorite blankets I have ever made, and I am so glad I finally got it all written down so you can make one too. Fair warning though, this crochet gingham heart blanket is not a beginner project. It is a sit-at-the-table, pay-close-attention, check-the-graph-twice kind of project.
Materials and Tools
- Yarn: Caron Simply Soft (100% acrylic, 170 g/6 oz, 288 m/315 yds)
- 2 skeins White
- 1 skein Strawberry
- 1 skein Soft Pink
- Hook: Size K / 6.5mm
- Notions: Tapestry needle, scissors
Gauge and Finished Size
This pattern uses a tweaked cluster version of the corner to corner stitch, so your gauge will depend on your tension with that method.
If you work just the heart section with one row of white blocks around it, the C2C portion measures approximately 20 x 17 inches. After adding six rounds of the block stitch border, the finished blanket measures approximately 32 x 30 inches.
If you prefer to work the entire graph as a full C2C without scaling it down, the estimated finished size is approximately 36 x 28 inches, based on the same yarn and hook.
Pattern Notes
The gingham pattern involves frequent color changes, and that makes it challenging. I want to be upfront about that. This is not a beginner friendly project, and it is not a project you can casually work on in your lap while watching TV. It needs your full attention and a flat surface to work on.
To cut down my time at the table, I chose to scale back the C2C portion. Instead of working the entire graph, I drew a line around the heart leaving just one row of white blocks around it. That is all I worked in C2C. Then I filled in the rest with the block stitch border, which is much more relaxing to work.
One more thing. I made a mistake on mine and missed one row of white blocks above the heart. My heart ended up sitting a little closer to the top border because of it. I noticed ten rows too late to fix it. So if yours looks perfectly centered, you did better than me.
I also recommend printing the graph before you start. Color in the boxes to make the color changes easier to track. The X symbol represents the darker color (Strawberry), the O is for the medium color (Soft Pink), and white is white.
Abbreviations
- CH = chain
- DC = double crochet
- DC2tog = double crochet two together (cluster stitch)
- SC = single crochet
- ST = stitch
- C2C = corner to corner
Special Stitches
Tweaked C2C Cluster Square: Instead of the standard C2C block, I use a cluster version that gives the blanket a thicker, chunkier look. Each square is made with a DC and two DC2tog clusters rather than three standard DCs.
Block Stitch Border: The border is worked in rounds using DC, DC2tog clusters, and DC groups set inside chain-2 spaces. It creates a neat, chunky block effect that frames the heart beautifully.
Pattern Instructions
Preparing Your Yarn
Do not pull straight from the skein. Wind small fist-sized balls of each color before you start. Make at least three balls of each color to begin. You will be swapping colors constantly across the middle section, and having skeins attached will become a tangled mess very fast. Small balls are so much easier to manage.
Starting the Corner to Corner
Chain 6. In the 4th chain from the hook, work one DC. Then work one DC2tog cluster in the next stitch and one DC2tog cluster in the next stitch. You have made your first square.
Chain 6 again. In the 4th chain from the hook, work one DC. Work DC2tog clusters in the remaining two chain spaces. You now have your second square.
Flip the first square so the starting tail sits in the bottom left corner and the tops of those DCs line up with the last DC you made. Slip stitch into the first chain-3 space.
Chain 3, DC once, then DC2tog twice, all in the same space. That is your third square. Your first square should be lying horizontal with the tail at the bottom left. The other two are vertical.
Continuing to Increase
Chain 6, DC in the 4th chain from the hook, work DC2tog clusters in the remaining two chains. This is how every new square is made.
Turn. Slip stitch under the three chains of the previous square. You will be twisting the square you just made so the DCs face the opposite direction. Take a moment here to find those three chains before you move on.
Chain 3, DC, work two clusters, slip stitch into the next chain-3 space.
Continue increasing in this way, following your graph for color placement. Keep checking the graph row by row. When you get to the middle section of the heart, you will have five or more different color balls attached at the same time. That is normal and expected.
Changing Colors
When the graph calls for a new color, join it and crochet the number of squares shown. Do not fasten off the previous color. Leave it hanging and pick it back up when you return to that section on the next row. This is where having small balls of yarn really pays off.
Decreasing
Once you have reached the widest point of your traced outline, it is time to decrease. Instead of chaining 6 and adding a new square, turn and slip stitch across the square you just made. Slip stitch into the chain-3 space, chain 3, work one DC and two clusters. Make one more square next to that one. Continue decreasing in this way until the section is complete.
Finishing the C2C Section
When you finish the C2C portion, weave in all your ends. There are a lot of them. Give yourself about an hour to get it done. Put on something comfortable to watch and just work through it. It is very satisfying once it is done.
Border
Pull up a loop in a chain-3 space at any corner. I like to slip stitch first and then work a SC. Use whatever method you prefer.
Round 1 (Foundation round): Chain 2, SC in the space between the blocks, chain 2, SC in the space between the next blocks. Continue all the way across. At each corner, SC into the chain-3 space and chain 3 to turn the corner. Work the next SC between the next blocks. Repeat all the way around and slip stitch into the first SC to close the round.
Round 2 (Block stitch round): Continuing in the same direction, insert your hook under a chain-2 space and slip stitch. Chain 3, work one DC2tog cluster and one DC all in that same chain-2 space. In the next chain-2 space work one DC, one cluster, and one DC. Repeat across.
At the corners, make a box using the post of the last DC. Insert your hook under the post of that DC, slip stitch, chain 3, work a cluster and one more DC. Continue down the next side working into the chain-2 spaces.
When you arrive back at the start, work one last block around the post of the last DC. Slip stitch under the chain-3 space that started the round.
Round 3: Chain 2, SC between the blocks all the way around. At the corners, work 3 chains to turn. Slip stitch to close.
Repeat Rounds 2 and 3 for a total of six border rounds. I worked the first three rounds in White. Then I added one round of Soft Pink, one round of Strawberry, and one more round of Soft Pink. I always crocheted in the same direction throughout.
Final Round: Work one round of all SC around the entire blanket. Work 3 SC into each corner. Fasten off and weave in ends.
Tips
Working the gingham section really does require your full attention. I set up at the kitchen table with my graph printed and colored in, and I checked it constantly. Do not try to rush this part.
Make more small yarn balls than you think you need before you start the middle section of the heart. Running out mid-row and having to stop to wind more is frustrating.
If you make a mistake deep into the C2C section and it is more than a few rows back, take a breath and ask yourself honestly if it will be noticeable in the finished blanket. Sometimes it will not be. My heart sat slightly off-center and I still love the blanket.
The block stitch border is a wonderful way to extend the blanket without adding more C2C rows. It is rhythmic, fast, and very relaxing after all those color changes.
Caron Simply Soft is a beautiful yarn for gingham. The colors blend and contrast in exactly the right way to make that classic gingham look really pop.
Frequently Asked Questions
Is the crochet gingham heart blanket suitable for beginners? This pattern is not beginner friendly. It requires a solid understanding of the corner to corner stitch, comfortable color changing, and the ability to read a graph. If you are new to C2C, I recommend practicing the basics first before attempting this one.
What size is the finished crochet gingham heart blanket? The version shown in this pattern, which uses a scaled-down C2C section with six rounds of block stitch border, measures approximately 32 x 30 inches. If you work the full graph as C2C, the estimated size is closer to 36 x 28 inches.
Can I use a different yarn for this pattern? Yes, you can substitute another worsted weight yarn. Just make sure it is a similar weight to Caron Simply Soft and check that your hook size gives you a fabric you are happy with. The color contrast is important for the gingham effect, so choose colors with clear light, medium, and dark values.
How do I manage all the yarn color changes in the gingham section? Wind small fist-sized balls of each color before you start. Do not pull straight from the skein. Having small balls lets you trade colors easily without tangling. Make at least three balls of each color to begin and wind more as you go.
How long does it take to make the crochet gingham heart blanket? The C2C section takes the most time because of the constant color changes and the need to check the graph row by row. The border goes much faster. Allow extra time at the end for weaving in ends since there are quite a few after all those color changes.
I share daily crochet inspiration on Pinterest. Save this article to your Pinterest boards so you can come back to it whenever you are ready to start.