I picked up two new yarns this summer and could not stop thinking about what they would look like together. Bernat Cotton Terry had just come out in the most gorgeous coastal shades, and the moment I saw the French Twill and Bayou colorways side by side, I knew exactly what I wanted to make. A baby blanket. A boy baby blanket, specifically. Something that felt fresh and earthy and a little bit woodsy all at once.
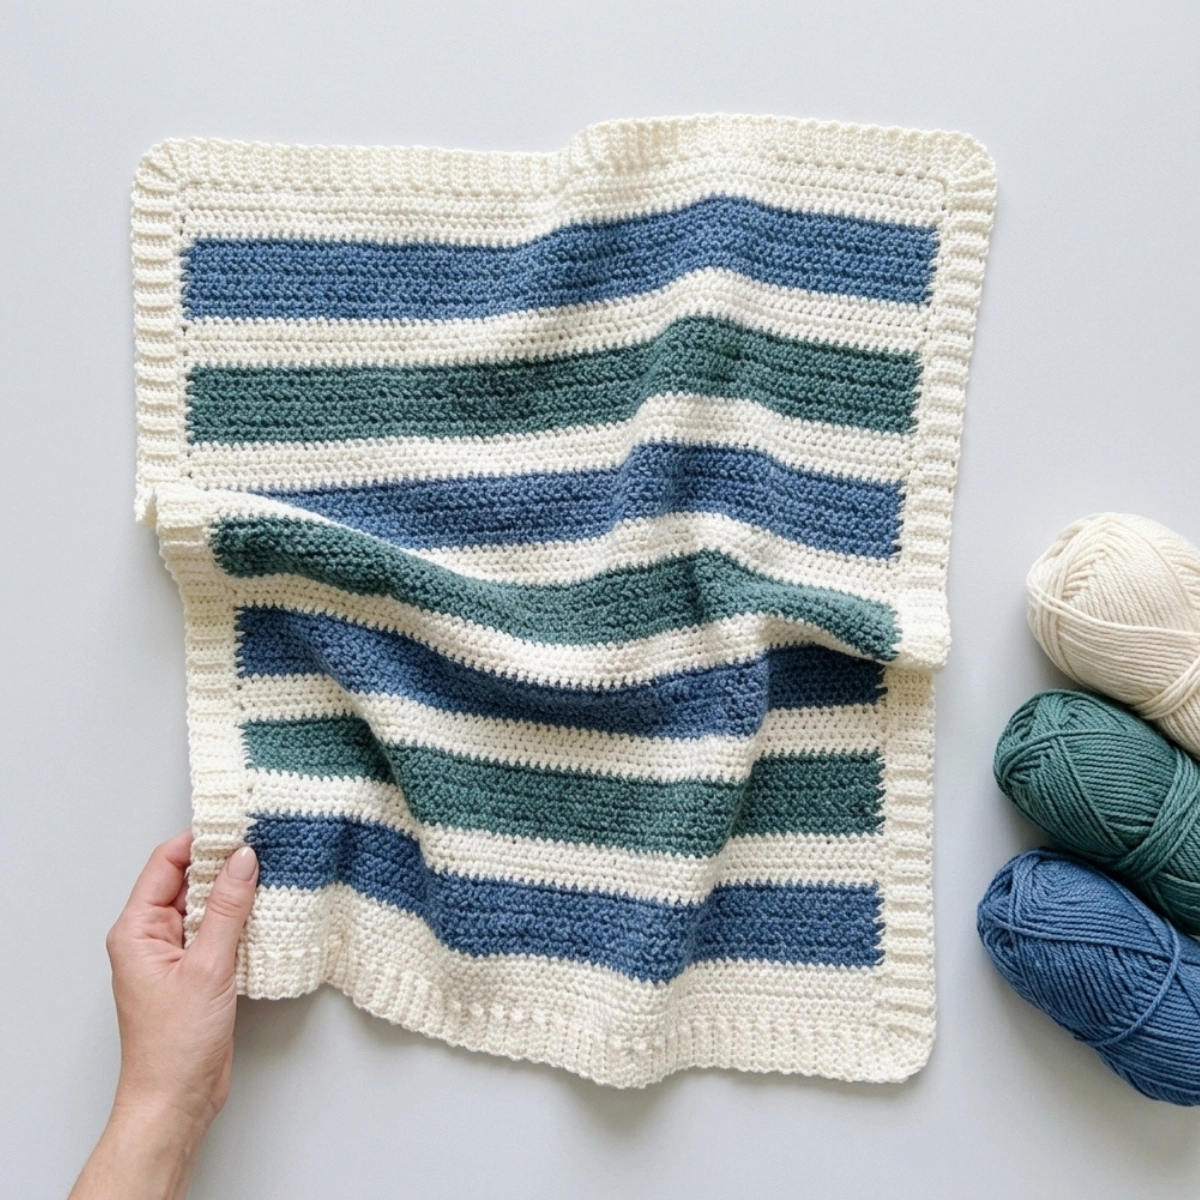
So I paired the Cotton Terry with Bernat Softee Cotton in a natural cream, layered them into stripes, and worked the whole thing in the Herringbone Half Double Crochet stitch. This free crochet Coastal Pines baby blanket pattern came out even better than I imagined. The contrast between the loopy, textured terry yarn and the smooth cotton is so satisfying, both to make and to look at. It has this cozy, organic feel that would be perfect for a fall baby.
Why You’ll Love This Coastal Pines Baby Blanket
- Two yarns, one stunning texture. Mixing Bernat Cotton Terry with Softee Cotton gives you a blanket that looks like it took way more skill than it actually did.
- One stitch, the whole way through. The main body is entirely Herringbone Half Double Crochet. No pattern repeats to memorize, no switching stitches mid-project.
- Baby-safe materials. Both yarns are cotton-blend, making this blanket breathable and soft against sensitive newborn skin.
- Great for beginners. If you can work the HHDC stitch, you can finish this blanket. It is genuinely that straightforward.
- The border is a showstopper. The ribbed border finish adds a polished, almost tailored edge that makes the whole blanket look custom.
Yarn and Materials for the Coastal Pines Baby Blanket
Bernat Cotton Terry is a worsted weight cotton blend with a loopy, terry cloth-like texture that is surprisingly easy to work with. The Softee Cotton in natural cream plays off those blue and green shades beautifully, grounding the whole color palette without competing with it. Together they make a blanket that feels luxurious without being fussy.
Materials:
- Bernat Softee Cotton (60% cotton, 40% acrylic | 120 g / 4.2 oz | 232 m / 254 yds per skein)
- 3 skeins in Cotton (natural/cream)
- Bernat Cotton Terry (47% cotton, 32% acrylic, 21% nylon | 120 g / 4.2 oz | 209 m / 229 yds per skein)
- 2 skeins in French Twill (blue)
- 2 skeins in Bayou (green)
- Size H / 5.00mm crochet hook
- Tapestry needle
- Scissors
Sizing and Gauge
The finished blanket measures 34 inches wide by 39 inches long, which is a great size for a crib or stroller blanket. It has enough coverage to tuck around a baby without being overwhelming.
Gauge for this pattern is 14 stitches and 14 rows of HHDC = 4 inches. Gauge really does matter here because the blanket is meant to land at a specific size. If your gauge is off, your finished dimensions will shift. I always recommend crocheting a small swatch before diving in, especially if you are trying a new yarn for the first time.
If you want to adjust the size, the starting chain needs to be a multiple that fits your desired width. The pattern chains 120 to start, but you can go up or down from there. Just remember that each 14 stitches equals roughly 4 inches, so you can do the math from there.
Size reference:
- Finished size: 34 in x 39 in
- Gauge: 14 st and 14 rows HHDC = 4 in
- Starting chain: 120
Key Pattern Details at a Glance
- Finished size: 34 in x 39 in
- Gauge: 14 st / 14 rows HHDC = 4 in
- Hook size: H / 5.00mm
- Yarn weight: #4 Worsted
- Skill level: Beginner / Easy
- Construction: Worked flat in rows with a final ribbed border worked in rounds
How to Adjust the Size
Because this is a striped, row-by-row blanket, adjusting the size is simple. The starting chain of 120 gives you the 34-inch width. If you want a wider blanket, add 14 stitches (about 4 inches) to your starting chain. For a smaller lap or stroller size, subtract 14 stitches. The stripe sequence stays exactly the same no matter what width you choose. Just keep working until your blanket reaches the length you want.
Crochet Abbreviations (US Terms)
- HHDC – Herringbone Half Double Crochet: YO, insert your hook into the stitch, YO and pull up a loop, then pull that loop directly through the first loop on your hook (this is what makes it “herringbone”), YO and pull through the remaining two loops on your hook.
- SC – Single Crochet: Insert your hook into the stitch, YO and pull up a loop, YO and pull through both loops on your hook.
- SL ST – Slip Stitch: Insert your hook into the stitch, YO and pull the loop directly through the loop already on your hook.
- CH – Chain: YO and pull through the loop on your hook.
- YO – Yarn Over: Wrap the yarn over your hook from back to front.
- BLO – Back Loop Only: Insert your hook into only the back loop of the stitch.
How to Crochet the Coastal Pines Baby Blanket — Step-by-Step Pattern
Starting Chain
With Cotton (cream) color, chain 120 or any number you prefer.
Main Body
Row 1: Starting in the 2nd chain from the hook, work 1 HHDC in each chain across. CH 1 and turn. (The turning chain does not count as a stitch.)
Row 2: Work 1 HHDC in each stitch across the row. CH 1 and turn.
Repeat Row 2 for the entire blanket, following the color sequence below.
Stripe Color Sequence
Work the rows in this order, then repeat the full sequence until you have 12 total alternating blue and green stripe sections (or your desired length):
- 4 rows Cotton (cream)
- 6 rows French Twill (blue)
- 4 rows Cotton (cream)
- 6 rows Bayou (green)
- 4 rows Cotton (cream)
Repeat from the beginning until you have 12 alternating blue and green stripes total.
Changing Colors
To switch colors, work the last HHDC of the row up until the very last step. Then pull through with your new color to finish that final stitch. Leave a tail on both the old and new yarn to weave in later.
Tip for carrying cream yarn: If you want to avoid weaving in a lot of ends, you can carry the cream Cotton yarn up the side of your work instead of cutting it after every cream section. Once you finish a blue or green section, simply pull the cream yarn up gently along the edge so it lies flat against the side. When you work the border, you will cover those carried strands. This way you only have the blue and green ends left to weave in at the end.
Border
Round 1: Choose your favorite side of the blanket and make sure it is facing you. Pull up a loop in any corner and CH 1. Work 1 round of SC around the entire blanket. Work 1 SC per row on the two side edges, and 1 SC per stitch along the top and bottom edges. Work 3 SC in each corner stitch. Join if desired or continue working in a spiral.
Round 2 — Ribbed Border: At the starting corner, slip stitch into the starting stitch, then CH 6. Working back toward the blanket edge, start in the 2nd chain from your hook and SC in each of the 5 chains. SL ST into the next stitch on the blanket edge, then SL ST into the stitch after that. Turn and work SC in the back loops only of each of the 5 SC you just made. CH 1 and turn. Work back down the same 5 stitches in SC through the back loops only. (Watch for that 5th stitch — it can pull tight and hide a little.)
Continue repeating this sequence all the way around the blanket.
Working the corners: When you reach each corner, SL ST once into the corner stitch, then turn and work back loop SC back up the border as usual. Return and SL ST into that corner space again. Repeat this two more times total, so that the corner border fans out neatly around the turn. After finishing the corner, continue working the ribbed border along the next side.
Finishing the border: When you reach your starting corner again, work that corner the same way as the others. Once you are at the top of the border, tie off and leave a long tail. Use a tapestry needle to sew the two sides of the starting corner together so the border looks seamless. Tie off and weave in all remaining ends.