I seriously cannot stop making baby sweaters. Every time I finish one, I’m already thinking about the next. My kids tease me about it, but honestly, is there anything more satisfying than holding a tiny little cardi you just crocheted from scratch? I don’t think so.
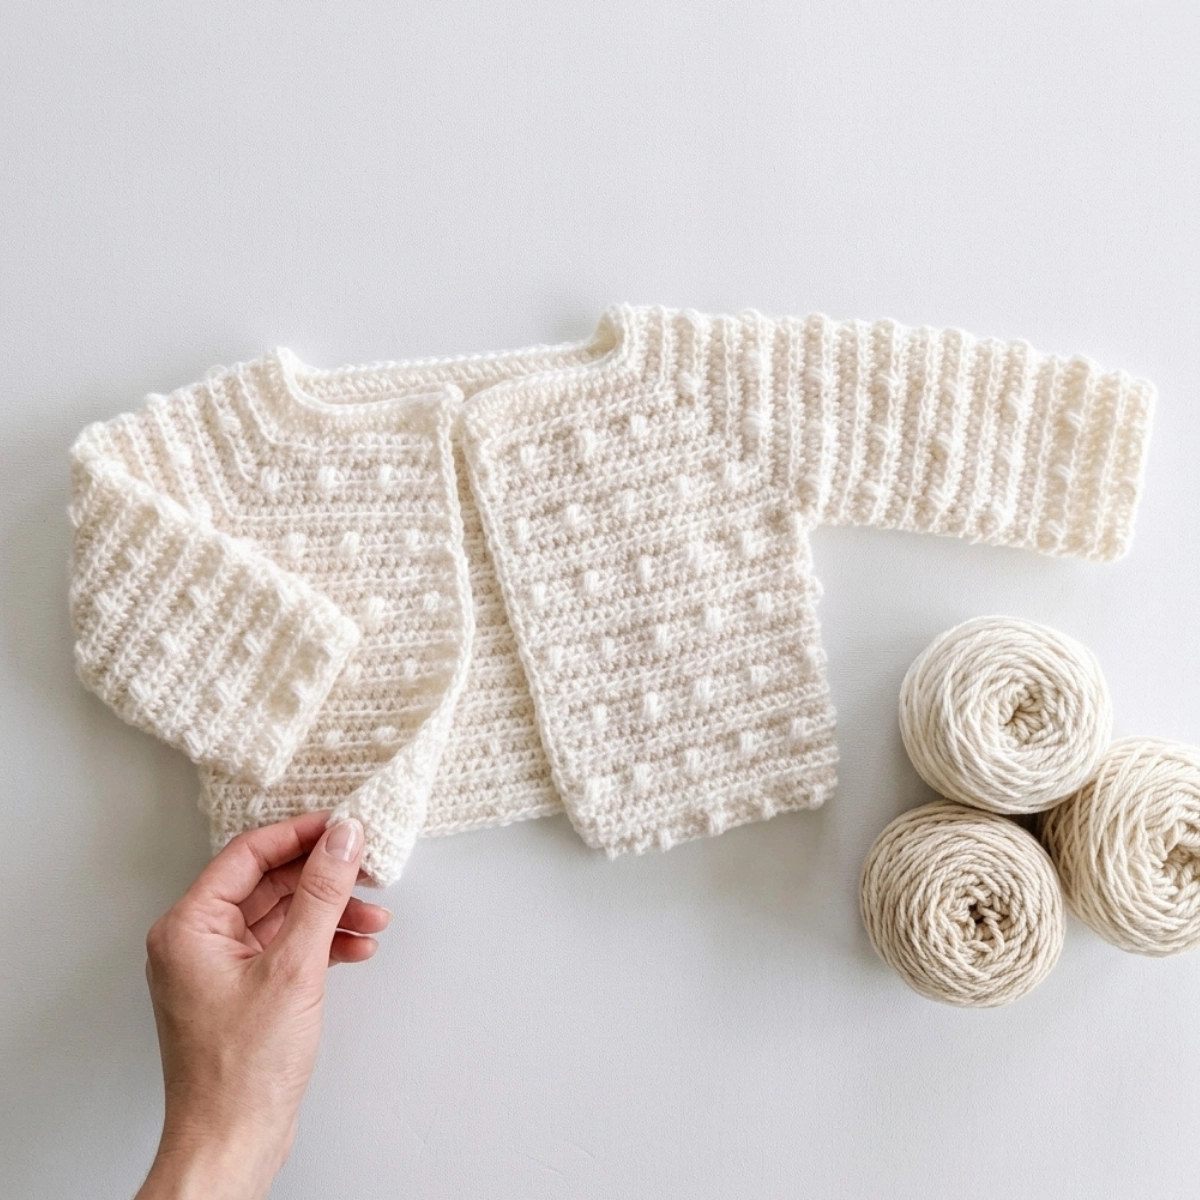
This scattered dot crochet baby sweater came together in the most relaxed, playful way. I had leftover Sugar Bush Nanaimo yarn sitting in my basket after finishing a hat, and I just picked up my hook and started playing. No rigid plan, no complicated stitch count to obsess over. Just me, the yarn, and a simple rule: puff stitch every 4th stitch, every 4th row, no matter what. That’s it. The dots scattered wherever they wanted to land, and the result was this sweet, airy little sweater that I am completely in love with.
Why You’ll Love This Scattered Dot Baby Sweater
- The yarn is absolutely dreamy. Baby alpaca and silk together? It’s one of the softest things I’ve ever worked with. This sweater feels as special as it looks.
- The dot placement is stress-free. You don’t need to track exact placement. Every 4th stitch, every 4th row, wherever it falls. Random is the whole point.
- It works up faster than you’d think. Despite the fine weight yarn, the construction is straightforward and the rows build up nicely.
- It’s a gorgeous handmade gift. This is the kind of sweater you bring out for photos, holidays, or a special Sunday outfit. It’s that pretty.
- Beginner-friendly construction. If you know how to HDC and have tried a puff stitch before, you can absolutely make this free crochet baby sweater pattern.
Yarn and Materials for the Scattered Dot Baby Sweater
Sugar Bush Nanaimo is one of those yarns that feels like a treat the moment it hits your hands. The blend of 80% baby alpaca and 20% mulberry silk gives it a gorgeous, fluid drape and a softness that honestly makes you want to keep crocheting just to keep touching it. The way it catches light is subtle and beautiful, perfect for a delicate baby garment.
Here’s everything you need for this easy crochet baby sweater:
- Yarn: Sugar Bush Nanaimo, 80% baby alpaca / 20% mulberry silk
- Weight: Super Fine, Weight 1
- Ball size: 50g / 1.75 oz, 164 yards / 150 meters per skein
- Amount: 2 skeins, any color
- Care: Hand wash, dry flat
- Hook: Size E-4 / 3.5mm
- Scissors
- Tapestry needle
- Button (optional, for closure at neckline)
- Stitch markers (highly recommended for marking corner stitches)
Sizing and Gauge
This pattern is written for a 3 to 6 month baby size. Because this yarn is a super fine weight 1 and I used a smaller hook than the package recommends, the finished sweater has a beautiful drape rather than a stiff, dense fabric. That’s exactly what I was going for.
I didn’t work up a formal gauge swatch for this one. What I recommend instead is measuring shoulder to shoulder on the baby you’re making this for. You keep building rows and don’t join for the armholes until your work spans that shoulder-to-shoulder measurement. That’s the most reliable way to size this correctly.
Size reference:
- As written: 3 to 6 month baby
- With worsted weight (size 4) yarn and HDC: approximately a size 4 toddler
- Sleeve and body length can both be easily extended by adding more rows
Practical tip: Place a stitch marker in the middle stitch of each 3-HDC corner increase the moment you make it. If you’re even one stitch off on those corners, the front panels will start to slant. The stitch marker takes all the guesswork out of it.
Key Pattern Details at a Glance
- Finished size: 3 to 6 months
- Hook size: E-4 / 3.5mm
- Yarn weight: Super Fine / Weight 1
- Gauge: Not specified; adjust to shoulder-to-shoulder measurement
- Skill level: Beginner to Easy Intermediate
- Construction: Worked flat from the top down, sleeves worked in the round
How to Adjust the Size
The starting chain is 66 stitches, which is based on the same foundation used in a Color Block Sweater pattern written for a size 4-5 small child, but made with a heavier yarn and a taller stitch. If you want to go bigger, the simplest approach is to switch to a size 4 worsted weight yarn and keep the same HDC construction. That will naturally give you a larger garment, roughly toddler size 4. From there, just add rows to the body and sleeves until the fit looks right.
Crochet Abbreviations (US Terms)
- CH — Chain
- ST / STS — Stitch / Stitches
- SL ST — Slip stitch
- YO — Yarn over
- HDC — Half double crochet
- DOT (Puff Stitch) — See full definition below
- SK — Skip
Puff Stitch (DOT) — Step-by-Step:
- Yarn over, insert hook into the designated stitch, yarn over and pull up a loop.
- Yarn over, insert hook into the same stitch, yarn over and pull up a loop. (You now have 5 loops on your hook.)
- Yarn over, insert hook into the same stitch one more time, yarn over and pull up a loop. (You now have 7 loops on your hook.)
- Yarn over and pull through all 7 loops on the hook.
That’s your dot. It pops right up to the surface and creates a sweet little bobble texture scattered across the fabric.
HDC — Half Double Crochet: Yarn over, insert hook into the stitch, yarn over and pull up a loop, yarn over and pull through all three loops on the hook.
How to Crochet the Scattered Dot Baby Sweater — Step-by-Step Pattern
Foundation
Chain 66.
Row 1: HDC in the 3rd chain from the hook. 1 HDC in each remaining chain space. (64 HDC total) CH 1 and turn.
Yoke Shaping
Row 2: CH 1 and turn. 1 HDC in each of the next 10 sts, 3 HDC in the 11th st, 1 HDC in each of the next 8 sts, 3 HDC in the next st, 1 HDC in each of the next 22 sts, 3 HDC in the next st, 1 HDC in each of the next 8 sts, 3 HDC in the next st, 1 HDC in each of the remaining 12 sts. CH 1 and turn.
These 4 points where you work 3 HDC are your raglan corners. They mark the two front panels, the back panel, and the two sleeve sections.
Row 3: 1 HDC in each stitch across, working 3 HDC into the middle stitch of each 3-HDC corner group from the row below. CH 1 and turn.
This is your standard increase row. You’ll come back to it often.
Row 4 (Dot Row): Work 1 HDC into the next 3 sts, then 1 DOT into the next st. Repeat from the beginning across the entire row, continuing to increase at each of the 4 corners by working 3 HDC into the middle corner stitch. If a dot falls directly on a corner stitch, go ahead and work it there.
Tip: Use a stitch marker to tag the middle stitch of each corner group the moment you complete it. Being even one stitch off will cause the front panels to slant. The stitch markers keep you honest.
Rows 5 through 7: Work as Row 3 (plain HDC across, increasing at corners).
Row 8: Work as Row 4 (dot row, increasing at corners).
Rows 9 through 11: Work as Row 3.
Joining for Armholes
Row 12: This is where you separate the sleeves from the body. Work the dot pattern every 4th stitch up to the first corner. Work 1 HDC into the middle corner stitch, then SKIP all the stitches of the sleeve section over to the next corner middle stitch. Work 1 HDC into that middle stitch. Continue the dot pattern across the back to the next corner, work 1 HDC into that middle stitch, SKIP the second sleeve section, work 1 HDC into the next corner middle stitch, and continue the dot pattern to the end of the row.
If a dot happens to land on one of the middle corner stitches at the underarm join, just shift it to the next stitch. It’s a scattered dot sweater. Keep it easy.
Body
Rows 13 through 15: CH 1 and turn. 1 HDC in each stitch across. CH 1 and turn at the end of each row.
Row 16: Work 1 DOT every 4th stitch across the row. CH 1 and turn.
Rows 17 through 28: Repeat rows 13 through 16 (3 plain HDC rows, then 1 dot row).
Tie off and weave in ends.
Sleeves
The sleeves are worked in the round from each armhole opening.
Round 1: Pull up a loop at the center underarm, CH 1. Work 1 HDC in the same space. To close the underarm gap cleanly, work a joining HDC over the first 2 underarm stitches like this: YO, insert hook into the first stitch and pull up a loop, YO, insert hook into the next stitch and pull up a loop, YO and pull through all loops. Then work 1 HDC in the next stitch, 1 DOT in the next stitch, 1 HDC in each of the next 3 stitches, 1 DOT. Continue working 3 HDC then 1 DOT around the sleeve. To close the round at the underarm, work the same joining HDC over the last 2 underarm stitches to match the start. Join with a SL ST to the first HDC. CH 1 and turn.
Take a moment to count your stitches at the end of this round. Note the count and keep it consistent for every remaining round and for the second sleeve.
Rounds 2 through 4: 1 HDC in each stitch around. Join with a SL ST to the first stitch. CH 1 and turn.
Round 5 (Dot Round): Work 1 HDC in 3 sts, then 1 DOT in the next st. Repeat around. Join with a SL ST to the first stitch. CH 1 and turn.
Rounds 6 through 21: Repeat rounds 2 through 5 (3 plain rounds then 1 dot round).
Tie off. Repeat the entire sleeve section for the second armhole.
Finishing Border
Weave in all your ends first. Then pull up a loop in the lower front right corner of the sweater, with the right side facing you and the dots facing forward.
Work 1 HDC in each stitch along the bottom hem, then 1 HDC per row up the front right side, 3 HDC into each corner space, 1 HDC across the back neck, 3 HDC into the next corner, and 1 HDC per row down the front left side.
If adding a button: When you reach the upper left front corner, work the 3 HDC into the corner, then chain however many chains you need to create a loop that fits your chosen button snugly. Resume HDC down the rest of the front left edge.
If skipping the button: Simply continue with HDC all the way around.
Join the border round with a SL ST and tie off. Weave in all remaining ends.