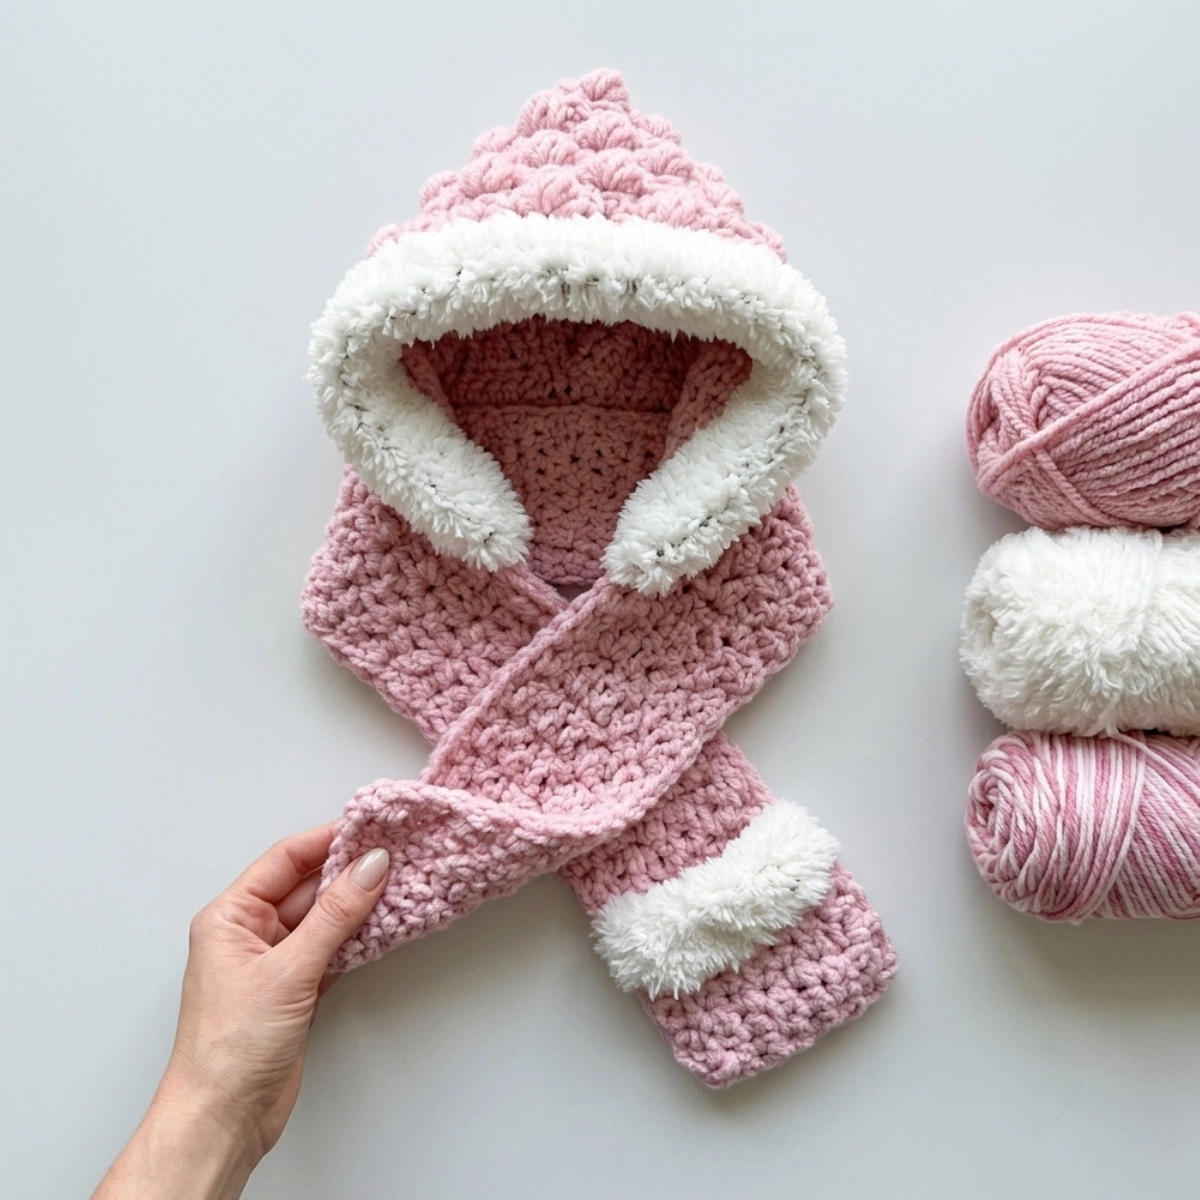
If you have been on the hunt for a crochet project that is cozy, practical, and totally kid-approved, this children’s crochet pocket scarf is it. The Prim Pocket Scarf is an oversized hooded scarf with deep pockets, and it works up quickly in super bulky yarn. It takes the place of a hat, scarf, and mittens all in one, which means no more hunting for that one lost mitten before school. This children’s crochet pocket scarf is designed for ages 1 to 12, and it is the kind of make that stays in the gift rotation year after year.
Materials and Tools
- Lion Brand Wool-Ease Thick & Quick (Weight: 6/super bulky, 106 yds, 6.0 oz)
- Blossom #640-103: 2 balls (size Large: 3 balls)
- Eggplant #640-107: 2 balls (size Large: 3 balls)
- Lion Brand Go for Faux (Weight: 6/super bulky, 65 yds, 3.5 oz)
- Chinchilla #322-204: 1 ball
- U.S. N (10.00 mm) crochet hook
- Yarn needle
- Stitch markers
The Wool-Ease Thick & Quick is one of my go-to yarns for fall and winter projects. It has the warm, textured feel of wool but it is 80% acrylic and 20% wool, so you get that cozy look without any scratchy feeling on little necks. It comes in about 40 colors, which makes finding the perfect shade really fun.
The Go for Faux yarn is 100% polyester and it feels incredibly soft, almost like bunny fur. I used it to trim the hood and pockets, and it adds such a beautiful fluffy finish. Since it is also super bulky weight, you can use the same hook throughout the whole project.
Gauge and Finished Size
Gauge: 9 stitches (including puff stitches) x 10 rows = 6 inches
Sizes:
- X-Small: approx. age 1 to 2 years
- Small: approx. age 3 to 5 years
- Medium: approx. age 6 to 8 years
- Large: approx. age 9 to 12 years
The samples shown are size X-Small on a 1.5-year-old and size Medium on a 6-year-old.
Pattern Notes
Work this pattern with a slightly loose stitch. This gives the hood and scarf a graceful, drapey feel that makes the finished piece look really polished. The beginning ch1 or ch2 is not counted as a stitch unless the pattern notes otherwise.
The scarf and hood are worked separately and then seamed together at the end. The faux fur trim is added before the seaming, so the finishing process comes together in a really satisfying order.
Abbreviations
- ch: chain
- st/sts: stitch/stitches
- sl st: slip stitch
- sc: single crochet
- hdc: half double crochet
- flo: front loop only
- RS: right side
- WS: wrong side
- FPdc: front post double crochet
- ps: puff stitch
Special Stitches
Front Post Double Crochet (FPdc): Yarn over, insert hook from front to back around the post of the stitch in the row below, pull up a loop bringing your hook back around the post of the stitch. Yarn over, pull through 2 loops on hook, yarn over, pull through the final 2 loops on hook.
Puff Stitch (ps): Yarn over, insert hook, pull up a loop. Repeat this 3 times total. Yarn over, pull through all 9 loops on hook.
The puff stitch is such a quick learn and it adds the most beautiful depth and texture across the hood. It looks impressive but it really only takes a few practice tries before it feels completely natural.
Pattern Instructions
Hood
Chain 34, 38, 38, 42.
Row 1: Working in the bottom loop only, hdc in 3rd ch from hook and in each ch across. Ch2, turn. (32, 36, 36, 40 sts)
Row 2 (RS): Hdc in first st, FPdc around next st. Repeat hdc, FPdc to the end of the row. Finish with hdc in ch2 space. Ch1, turn. (33, 37, 37, 41 sts)
Row 3: Sc2, ps. Repeat sc3, ps a total of 6, 7, 7, 8 times. Sc2, ch1, turn. (33, 37, 37, 41 sts)
Row 4: Sc, then repeat hdc, sc to the end of the row. Ch1, turn. (33, 37, 37, 41 sts)
Row 5: Sc4, then repeat ps, sc3 a total of 6, 7, 7, 8 times. Sc1, ch1, turn. (33, 37, 37, 41 sts)
Row 6: Sc, then repeat hdc, sc to the end of the row. Ch1, turn. (33, 37, 37, 41 sts)
Continuing by size:
- X-Small: Repeat Rows 3 to 6, two times.
- Small: Repeat Rows 3 to 6, two times, then work Row 3 one additional time.
- Medium: Repeat Rows 3 to 6, two times, then work Rows 3 and 4 one additional time.
- Large: Repeat Rows 3 to 6, three times.
Seaming the Hood
Fold the hood in half with the right sides together. Align the bottom corners of the back of the hood. Using a slightly loose stitch and working in the inside loops only (the loops that are closest together), slip stitch to the end to create the back seam of the hood. Break yarn.
Scarf
Chain 80, 96, 108, 120.
Rows 1 to 7, 7, 8, 8: Hdc in the 3rd ch from hook, sc. Repeat hdc, sc to the end of the row. Ch1, turn. (78, 94, 106, 118 sts)
Break yarn.
Hood Trim
With the right side facing up, join the faux fur yarn to the corner of the hood front.
Tip: When working with faux fur yarn, the stitches can be a little tricky to find. Try feeling where the next stitch is and keep a count of your stitches so you know you have worked every one by the time you reach the end of the row.
Row 1 (RS): Working in the front loops only, hdc to the end of the row. Ch1, turn. (33, 37, 37, 41 sts)
Rows 2 to 3, 5, 5, 5: Hdc to the end of the row. Ch1, turn. (33, 37, 37, 41 sts)
With the wrong side facing you, fold over the hood trim and slip stitch across the row using the front loops on the edge of the hood front and the front loops on the stitches of the hood trim. Break yarn.
Pockets
With the right side facing up, join faux fur yarn to the bottom corner of one end of the scarf. Ch1, hdc across the end of the scarf. Ch1, turn. Hdc across. Break yarn. Repeat for the other end of the scarf.
To create the pockets, count up the side 8 to 12 stitches, adjusting for the desired pocket depth and the recipient’s arm length. Pin both pockets to make sure they are even on each side.
Join yarn and slip stitch up each side of both pockets, including the sides of the faux fur rows at the top of the pocket. Break yarn.
Finishing
Fold the scarf in half with the wrong sides together and lay it inside the hood with the right sides together. Align the outside edge of the scarf with the bottom edge of the hood. Pin the pieces together to keep everything aligned while you work.
Join yarn and slip stitch around to seam the hood and scarf together. When finished, turn the hood right side out. Break yarn and weave in all ends.
Tips
Work the main body with a slightly loose tension throughout. A tight stitch will make the hood stiff and the scarf less drapey. If you tend to crochet tight, consider going up half a hook size for the hood and scarf sections.
When adding the faux fur trim, it helps to work slowly and feel for each stitch with your fingers rather than trying to see them. Keep a stitch count going in your head, or use a stitch marker every 10 stitches so you can easily track your progress.
Pin the pockets before seaming them. It takes an extra minute but it makes a big difference in how the finished scarf looks. Uneven pockets are the most common issue with this project, and pinning solves that completely.
When choosing your faux fur color, consider one that coordinates with both main yarn colors if you are making one scarf with two skeins of different colors. Chinchilla gray is a great neutral that works with almost any palette.
Frequently Asked Questions
What yarn weight do I need for this children’s crochet pocket scarf?
This pattern uses super bulky weight yarn (weight 6) for both the main body and the faux fur trim. For the main scarf and hood, Lion Brand Wool-Ease Thick & Quick is used. For the trim, Lion Brand Go for Faux adds the fluffy pocket and hood edging.
What hook size is needed for this crochet pocket scarf pattern?
You will need a U.S. N (10.00 mm) crochet hook for the entire project. Since both the main yarn and the faux fur yarn are super bulky weight, you can use the same hook from start to finish.
Is this children’s crochet pocket scarf pattern suitable for beginners?
Yes, it is a great project for beginners who have learned the single crochet and half double crochet. The puff stitch is the only special stitch used and it is easy to learn. The pattern also includes helpful tips for working with the faux fur yarn, which can feel a little tricky at first.
How many skeins of yarn do I need?
For sizes X-Small through Medium, you will need 2 skeins of the main yarn and 1 skein of the faux fur yarn. For size Large, you will need 3 skeins of the main yarn and 1 skein of the faux fur.
Can I adjust the pocket depth?
Yes. The pattern instructs you to count 8 to 12 stitches up the side for the pocket seams, so you have flexibility to adjust the depth based on the child’s arm length and how deep you want the pockets to be. Pinning both sides before seaming helps make sure the pockets are even.
I share daily crochet inspiration on Pinterest. Save this article to your Pinterest boards so you can come back to it whenever you are ready to start.