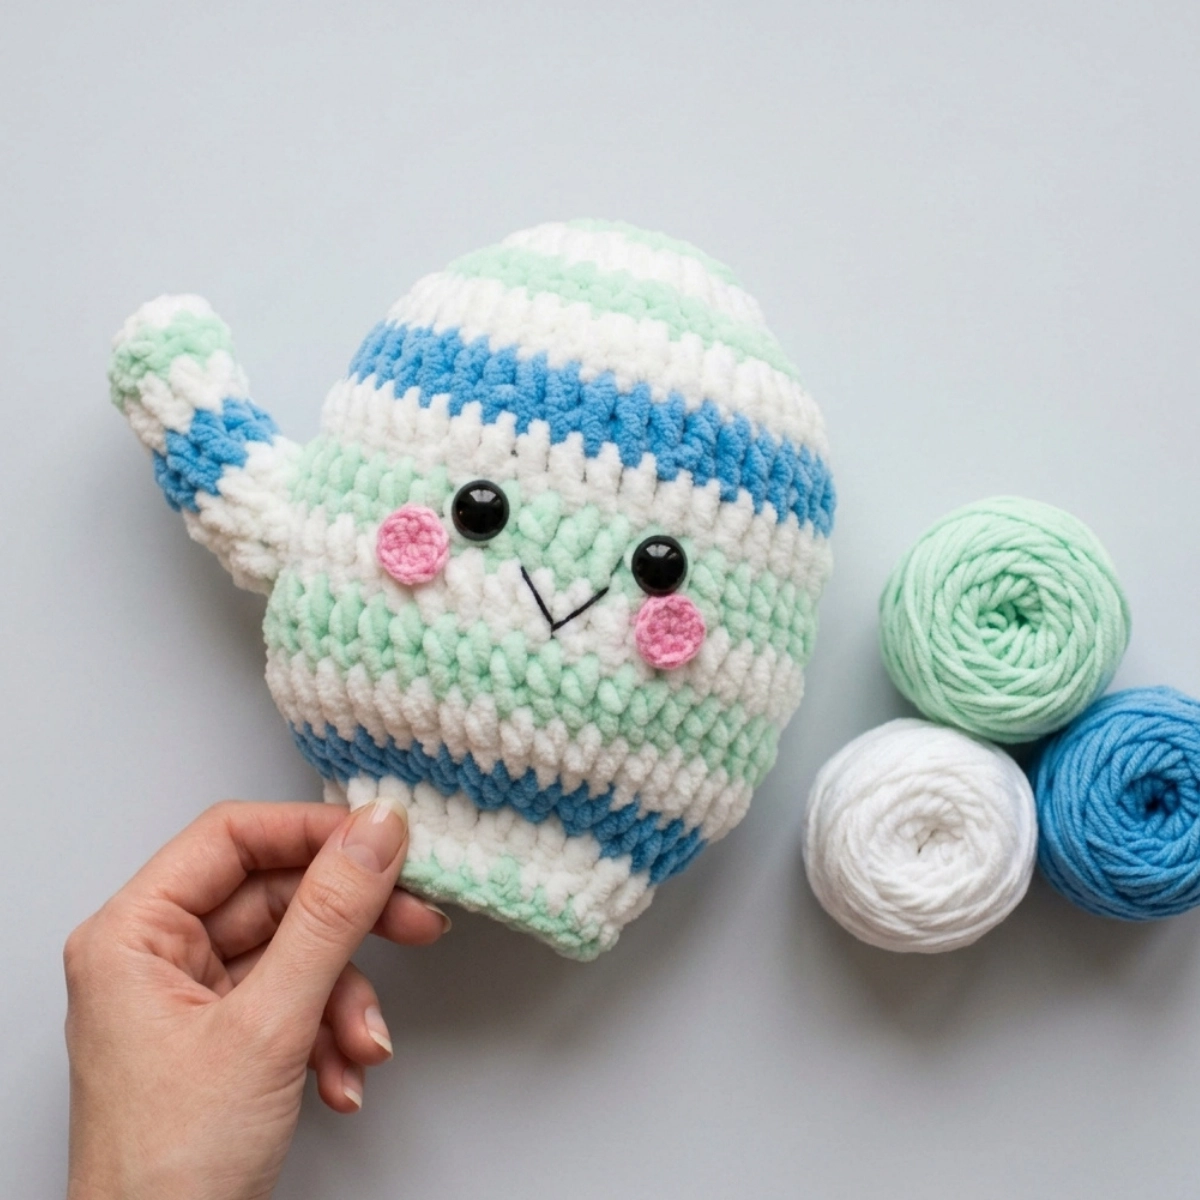
This winter mitten amigurumi is one of my favorite holiday makes. It is plush, super cute, and works up fast with bulky yarn. I love how it doubles as a cozy decoration you can toss on a couch or bed, and it makes such a sweet handmade gift. Make one in your family’s favorite color and give a cute mitten to everyone!
Materials and Tools
- Yarn 6 / Blanket Weight Yarn in any color
- Pink yarn for cheeks
- 7mm crochet hook
- 20mm safety eyes
- Tapestry needle
- Black embroidery thread
- Scissors
- Polyfill stuffing
Gauge and Finished Size
No gauge is specified for this pattern. The finished winter mitten amigurumi measures approximately 10.5 inches tall.
Pattern Notes
This winter mitten amigurumi pattern is rated easy and is great for beginners who are comfortable with basic amigurumi construction. The mitten body is worked in rounds using double crochet stitches, with a slight shape shift in the middle to give it that classic mitten silhouette. The thumb is worked separately and sewn on after. Read through all the instructions before starting so the thumb placement makes sense before you finish off the body.
The Ch 2 at the start of each round counts as a stitch throughout this pattern. At the start of each new round, SlSt to the Ch 2 from the previous round before beginning your new Ch 2.
Abbreviations
- MR: Magic Ring
- Ch: Chain
- SlSt: Slip Stitch
- Dc: Double Crochet
- Dc Dec: Double Crochet Decrease (invisible decrease worked over 2 stitches)
- Hdc: Half Double Crochet
- BLO: Back Loop Only
- St: Stitch
- (): Stitch count at end of round
Pattern Instructions
Mitten Body
In any color
Round 1: Make a Magic Ring. Ch 2, then Dc 7 times into the Magic Ring. The Ch 2 counts as a st. (8)
Round 2: SlSt to Ch 2. Ch 2, Dc into first st. Dc 2 times in each of the next stitches. (16)
Round 3: SlSt to Ch 2. Ch 2, Dc into first st. Dc in next st. Repeat 2 Dc into next st, Dc in next st all around. (24)
Round 4: SlSt to Ch 2. Ch 2, Dc into first st. Dc in next st. Repeat 2 Dc into next st, Dc in next 2 st all around. (32)
Round 5: SlSt to Ch 2. Ch 2, Dc into first st. Dc in next st. Repeat 2 Dc into next st, Dc in next 3 st all around. (40)
Rounds 6 to 11: SlSt to Ch 2. Ch 2, Dc into first st. 1 Dc in each st all around. (40)
Add safety eyes in Round 8, spacing them 5 stitches apart.
Round 12: Dc Dec all around. (20)
Round 13: Repeat 2 Dc in next st, Dc in next st all around. (30)
Rounds 14 to 15: Dc in each st all around. (30)
Round 16: Working in the BLO, Dc Dec all around. (15)
Round 17: Working in both loops, Dc Dec 7 times. Dc in last st. (8)
Finish off, leaving a long tail for sewing. Sew the remaining stitches closed and weave in ends.
Thumb
In any color
Round 1: Make a Magic Ring. Ch 2, then Dc 7 times into the Magic Ring. The Ch 2 counts as a st. (8)
Rounds 2 to 5: Dc in each st all around. (8)
Round 6: SlSt 3, Hdc, Dc 1, 2 Dc in same st, Dc 1, Hdc.
Finish off, leaving a long tail for sewing. Stuff lightly, then pin the thumb onto the side of the mitten as shown in the original reference photos and sew it on securely.
Cheeks
In pink, make 2
Round 1: Make a magic ring. Ch 2, Dc 8 times into magic ring. Tighten ring and SlSt to first st.
Finish off. Pin cheeks onto the mitten face on either side of the eyes, then sew or hot glue them in place. Weave in ends.
Smile
In black embroidery thread
Insert the needle into the middle area of the mitten and pull it out at the left side of the mitten’s eye. Reinsert the needle into the middle of the mitten and pull it out next to the right eye. Reinsert the needle into the middle of the mitten and pull it out nearby to secure. Tie the ends of the thread into firm knots and bring the knots inside the toy to hide them. Trim any excess thread.
Tips
Start with Round 8 in mind when adding your safety eyes. I found it easiest to count the stitches on that round before continuing, so the eyes sit centered and even on the face.
When sewing on the thumb, angle it slightly outward so it looks natural rather than stiff against the body. Pinning it in a few spots before sewing helps a lot.
If you want a firmer mitten, stuff it more fully before closing Round 17. If you prefer a softer, squishier result, use a lighter amount of stuffing.
The BLO round in Round 16 creates a subtle ridge that marks the cuff area of the mitten. It is a small detail but it really adds to the look, so do not skip it.
Blanket weight yarn works up so fast with this pattern. It is a great last minute holiday gift that still looks really thoughtful and handmade.
Frequently Asked Questions
Can I use a different yarn weight for this winter mitten amigurumi? Yes, you can use a lighter yarn weight, but you will need to adjust your hook size and expect a smaller finished size. The pattern is written for yarn weight 6 with a 7mm hook, which gives that plush, chunky look. Going down to a weight 4 with a 4mm hook would give you a much smaller mitten.
Do I need to stuff the thumb separately? Yes, stuff the thumb before sewing it onto the mitten body. It does not need much stuffing since it is small, just enough to give it a little dimension so it does not look flat.
What are the safety eyes for and can I use buttons instead? The 20mm safety eyes give the mitten its cute kawaii face. If you are making this for a small child, it is safer to embroider the eyes with black yarn or thread instead of using safety eyes or buttons, which can be a choking hazard.
How do I make the smile look right? The smile is created by pulling embroidery thread through the mitten in three anchor points to form a curved shape. Go slowly and adjust the tension on each stitch before knotting off. The key is keeping the knots hidden inside the stuffing so the outside stays clean.
Is this winter mitten amigurumi pattern good for beginners? It is rated easy and works up in mostly double crochet stitches, so it is a good fit for someone who has made at least one or two amigurumi before. If you are brand new to crochet, practice your magic ring and double crochet first and this pattern will feel very manageable.
I share daily crochet inspiration on Pinterest. Save this article to your Pinterest boards so you can come back to it whenever you are ready to start.